
Microsoft Excel Sheet
Overview: A spreadsheet is similar to a giant table witht he borders extending practically to infinity. The spreadsheet that appears on your screen will be similar to that below.

Getting Around: Try This
- Open up a new spreadsheet and click your cursor in the cell B2, as seen in the following picture.

- Note that the cell reference, (B2) is seen in the Left-hand corner.
- Type 1 into the cell and press the Enter key.

Note: The text is on the Left-hand side of the cell and the numbers are on the Right-hand side.
Click Down & Drag Down Handle: to calculate the formula.
 Highlight the 2 from the cell number B3
 - Click and drag with your Left Mouse button on the Drag Handle and drag down to 3 on cell number B4
- now yousee is highlighted B3:B4
Changing Cell Widths: some cell widths are wider than other cells. The with of the cells can be set. Either sideways, or up & down.
![]()
Cell widths can by changed by dragging
- Move your cursor between A and B on the Column Row as shown above.
- Click and hold down your left mouse button and drag the cell A out to make more room in the cell.
Changing Cell Widths Automatically: Double Clicking on the lines between the cells, in the sam place as above. The cloumns then will increase or decrease it fit the biggest entry.
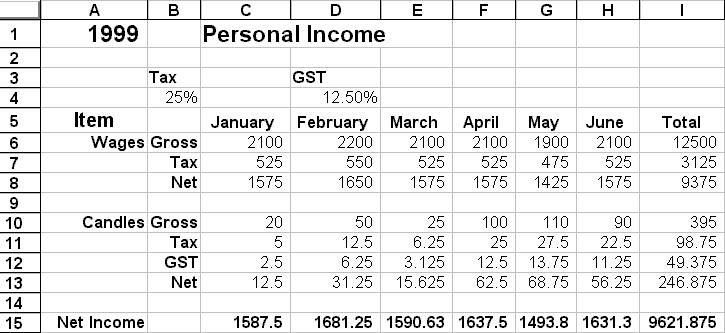
Try This Exercise: Personal Expense Sheet.
- Open a new spreadsheet.
- Type the information below into the cell references shown.
- For the words under Month of A3; type Jan into A4 and drag down to fill down. This will automaticall provide you with all the other months of the year.

- For the numbers under Income of B3; type 2120 into B4 and copy and paste.
- For the numbers under Expenditure C3 type 1900 into C4 and Fill in the blanks.
- Highlight the Cells A3:D3. Click on the Bold, and Centre

Autosum Button: Calculating the formular. See table below.

Remember the Drag button:
The Autosum button automatically generates the total calculations formular on the excel sheet.
1. Click on cell C10
2. Click on Autosum Button on the toolbar.
3. Drag the shading covers the cells that will be added together, and that is the formular appears in the cell box C10 as well as on the Formular Bar.
4. Repeat the above to add up the Income, and Savings
TRY Monthly Total Finance Fields: usign the same method - just change the direction.

Inserting Rows and Columns

Inserting a new Column - See Above.
1. Open your Personal Expense. Click in the Column G marker to highlight the entire G column.
2. Right click you mouse button and choose Insert.
3. A new column will be inserted, moving the Total column over one.
4. Highlight and drag, copy or cut and paste June Column into the space created in the new G Column.
5. Note that the formulas for the Total coumn have automatically added in the new information, and if not then add the autosum. Recalculate the formulars.
Inserting a new Row - by clicking on the Row 9 marker.
1. Right Click you mouse button and choose Insert.
Deleting Rows and Columns

Deleting a Column - See Above.
1. Open your Personal Expense. Click in the Column G marker to highlight the entire G column.
2. Right click you mouse button and choose Delete.
5. Note that the formulas for the Total coumn have automatically be calculated in the new information, and if not then change by using the autosum. Recalculate the formulars.
Deleting a Row - by clicking on the Row 9 marker.
1. Right Click you mouse button and choose Delete.
Centering across Columns: Setting the Heading (topic)![]() .
.
1. Mark the cells C1 to D1, so that they are highlighted.
2. Click on the Merge and Centre Button. (see below)
Date and Time Sheet Exercise: Harry's Bar (you can do your own personal)
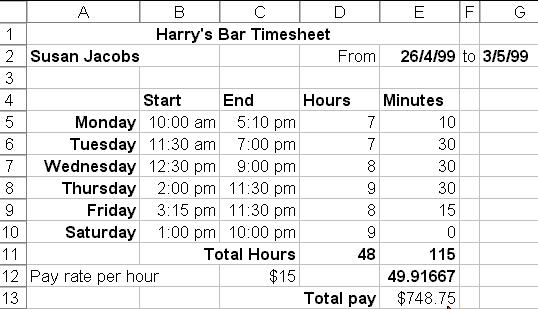
Fundtions Button: sum of
Hour: D5 = / =HOUR(C5-B5)
Minute: E5 = / =MIUNTES(C5-B5)
Using Sheets and Renaming:

In bottom of Excel there are number of sheets, like pages, that you can use at once. By clicking on a Sheet Tab you can move between the sheets, and easily rename, add, or delete sheets.
1. To add another sheet to the Workbook Right Click on a Sheet Tab and choose Insert, click on Worksheet, and click OK. A new sheet will be added called Sheet2.
2. To Rename a sheet. Click with your Right Mouse Button on Sheet 1. Click on Remane and call the sheet Harry's Bar or Personal Expense or Personal Income.
3. Go to File and Save. Close the file.