
MICROSOFT WORD
Getting Familiar with Microsoft Word for Windows
Microsoft Word is a word processing software package which can be used to type letters, reports, and other documents. This lesson will introdue you to the Word Window. To begin this lesson, Open Microsoft Word.
The window appears and your screen looks similar or more advanced to the one shown here.

Note: Every computer is different, and you could have Word 2007, or 2010, Windows Vista or Windows XP. These computer had settings that allow you to change the color and style of your windows.
The Microsoft Office Button or File: You can use the menu button to create a new tab, new window, new file, open an existing file, save a file, and perform many other tasks.

The Quick Access Toolbar: Next to or below is the Quick Access Toolbar. This provides you with access to commands you frequently use. By default Save, Undo, and Redo appear on the Toolbar. You can use Save to save a file. Undo to rollback on an action you have taken, and Redo to reapply an action you have rolled back.
![]()
The Title Bar: Title is on top just like any title. The Title Bar displays the title of the document on which you are currently working. Word names the first new document you open Document 1.
![]()
As You open additional new documents, Word names thems sequentially. When you save your document, you assign the document a new name.
The Ribbon: You use Ribbon to issue commands on Microsoft Word to what to do. The Ribbon is located on the toolbar with several tabs: clickign a tab displays related command groups. You click buttons to issue commands or to access menus and dialog boxes. Clicking the dialogue box launcher gives you access to additional commands.

The Ruler: The ruler is found below the Ribbon.
![]()
You can use the ruler to change the format of your document quickly. If your ruler is not visible, follow the steps listed here:
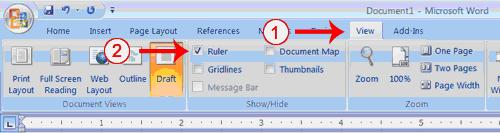
- Click the View Tab and choose.
- Click the Check Box next to Ruler in the Show/Hide group. The Ruler appears below the Ribbon.
The Text Area: Just below the ruler is a large area called the text area. You type your document in the text area. The Blinking Vertical Line in the Upper-left corner of the text area is the cursor. It marks the insertion point. As you type, your text displays at the cursor location. The Horizontal line next to the cursor marks the end of the document.

The Vertical and Horizontal Scroll Bars: These bars enable you to move up, down and across your window simply by dragging the icon located on the scroll bar.
- The Vertical Scroll Bar is located along the right side of the screen.
- The Horizontal Scroll Bar is located just above the status bar.
To move Scroll bar:
- To move Up & Down your document, click and drag the vertical scroll bar.
- To move Back & Forth across your document, click and drag the horizontal scroll bar.
The Status Bar: This appears at the very bottom of your window and provides such information as the current page and the number of words in your document
Change the Display: On the Status Bar by Right-clicking on the Status Bar, and selecting the options you want from the Customize Status Bar Menu. You click the Item to select. You click it again to deselect. A check mark next to an item means it is selected.

Understanding Document Views: In word, you can display your doucument in one of five views. Either Normal or Draft, Web Layout, Print Layout, Full Screen Reading, or Online Layout.
Normal or Draft View: This is the most frequently used view. You use normal or draft view to quickly edit your document.
Web Layout: It enables you to see your document as it would appear in the brower such as Internet Explorer.
Print Layout: This shows the document as it will look when it is printed.
Reading Layout: Formats your screeen to make reading your document more comfortable.
Outline View: Displays the document in outline form. You can display headings without the text. If you move a heading, the accompanying tex moves with it.
Before moving ahead, make sure you are in Draft or Normal Word Document.

Click on View Tab on the toolbar, and options are available to select.
Click : Be aware of your Mouse. Right Click, Left Click, or Double.
Understanding Nonprinting Characters: below are the characters which do not print and will not appear in your printer document, but do affect your document layout. You can elect to see these characters on the screen as you type or you can elect to have them remain invisib
This Table describes mos of them:
To View Nonprinting Characters: View Toolbar on homepage.

Place your Cursor: See #2 on the toolbar.
During the losson , you will often asked to place the cursor at a specific location (the insertion point) on the screen. You place the cursor by moving the cursor to the specified location and pressing the left mouse button or by using the arrow keys to move to the specified location.
Start a New Paragraph: Press Enter Key.
Close and Save - Windsow (file and save) or which options available on your computer.

Save Button:
- A menu appears.
- Click yes to save in the bottom-right corner.

Save As:
- Moving the file to correct folder.
- Name the file as Computer word document in the File Name Field.
- Click Save.

X marks the close File. If you like to Print - File Print and close the file.